Have you ever watched your kids light up with joy at the sight of bite-sized treats? These chocolate cake pops aren’t just adorable—they’re pure happiness on a stick. Whether you’re planning a birthday party, a fun afternoon in the kitchen, or simply craving a kid-friendly dessert, this recipe checks all the boxes.
What I love most is how easy and versatile they are. You can use leftover cake crumbs, get creative with colorful sprinkles, or even let little hands help with the dipping and decorating. It’s a fun dessert recipe that brings smiles before the first bite is even taken.
Table of Contents
Let’s turn your kitchen into a mini cake pop factory—because making sweet memories can be just as satisfying as eating them.
Key Benefits of Making Chocolate Cake Pops at Home
If you’ve never made chocolate cake pops from scratch, you’re in for a treat—literally and figuratively. These little delights are more than just cute—they’re a total win for busy parents, party planners, or anyone who loves easy, fun-to-make desserts that never fail to impress.
Here’s why you’ll absolutely love making them at home:
Perfect for Little Hands & Big Smiles
Their small, bite-sized shape makes them ideal for kids. Whether you’re serving them at a birthday party or just as a weekend surprise, they’re easy to grab, eat, and enjoy—no forks, no mess.
Great for Getting Kids Involved
This is a recipe that invites creativity. Kids can help crumble the cake, roll the balls, dip them in the chocolate coating, or go wild with sprinkles and toppings. It’s an experience that blends baking with bonding.
Budget-Friendly & Waste-Reducing
Got leftover cake? Perfect. These cake pops are a smart way to give that extra cake crumb new life, especially when paired with just a bit of frosting and a dash of creativity.
Customizable for Any Occasion
From holiday-themed pops to personalized party treats, you can switch up the chocolate, colors, or decorations to suit any celebration. Think red and green for Christmas, pastels for Easter, or spooky sprinkles for Halloween.
Easy to Make, Easy to Love
No fancy tools needed just basic kitchen staples like a bowl, spoon, and cake pop sticks (or even toothpicks if you’re improvising). Whether you’re a beginner or a baking pro, the process is simple and forgiving.
Cake pops aren’t just desserts—they’re little bites of joy that turn everyday moments into mini celebrations. And once you see how easy they are to whip up, you’ll wonder why you didn’t try them sooner.
Ingredients for Chocolate Cake Pops
Before we dive into the fun part rolling, dipping, and decorating—let’s get all your ingredients in order. The beauty of this chocolate cake pop recipe is that it’s super flexible. You can use a homemade chocolate cake, a store-bought cake mix, or even leftover cake crumbs. Whatever you have, we’ll make it work.
Here’s what you’ll need:
For the Cake Base
- 1 baked chocolate cake (about 9-inch round or 9×13 pan)
Tip: A moist cake works best it holds together when crumbled. - ½ to ¾ cup chocolate frosting (store-bought or homemade)
Enough to bind the crumbs start with less and add as needed.
For the Coating
- 12 oz chocolate candy melts or chocolate chips
Milk, dark, or white chocolate all work! Choose your favorite. - 1 tablespoon coconut oil or vegetable shortening (optional)
Helps thin the chocolate for smoother dipping.
To Assemble & Decorate
- Cake pop sticks or lollipop sticks
You can find these online or in most baking aisles. - Sprinkles, crushed nuts, mini chocolate chips, or shredded coconut
This is where you (and the kids) can get creative. - Styrofoam block or cake pop stand (for drying)
Not essential, but makes drying the pops upright much easier.
Optional but Helpful
- Parchment paper (for clean setup)
- Microwave-safe bowls (for melting chocolate)
- Refrigerator or freezer space (to help firm the pops)
Pro Tip: If you’re short on time, use a boxed cake mix and canned frosting. No judgment here—homemade cake pops can still taste amazing with a few shortcuts!
Now that your ingredients are ready, it’s time to roll up your sleeves—literally—and start creating these irresistible little chocolate bites. Let’s move on to how to bring them to life!
Instructions: How to Make Chocolate Cake Pops Step-by-Step
Ready to turn cake crumbs into delicious little chocolate-covered treats? Let’s walk through the process together—it’s easier than you think and a whole lot of fun (especially if you’re baking with kids!).
Step 1: Crumble the Cake
- Once your chocolate cake is completely cool, break it into small pieces.
- Using clean hands or a food processor, crumble it into fine, even crumbs.
Tip: Avoid big chunks—finer crumbs give you smoother, tighter pops.
Step 2: Mix in the Frosting
- Start by adding ½ cup of chocolate frosting to the crumbs.
- Gently mix until the texture resembles dough that holds together when pressed.
Too dry? Add a spoonful of frosting at a time until it binds without being sticky.
Step 3: Roll into Balls
- Scoop a tablespoon of the mixture and roll it into a ball using your palms.
- Place each cake ball onto a parchment-lined baking sheet.
- Repeat until all the mixture is used—this should make about 20–24 cake pops.
Consistency counts—try to keep them the same size for even chilling and dipping.
Step 4: Chill the Cake Balls
- Refrigerate for at least 2 hours, or freeze for 30 minutes until firm.
Chilling helps them stay on the stick and keeps their shape during dipping.
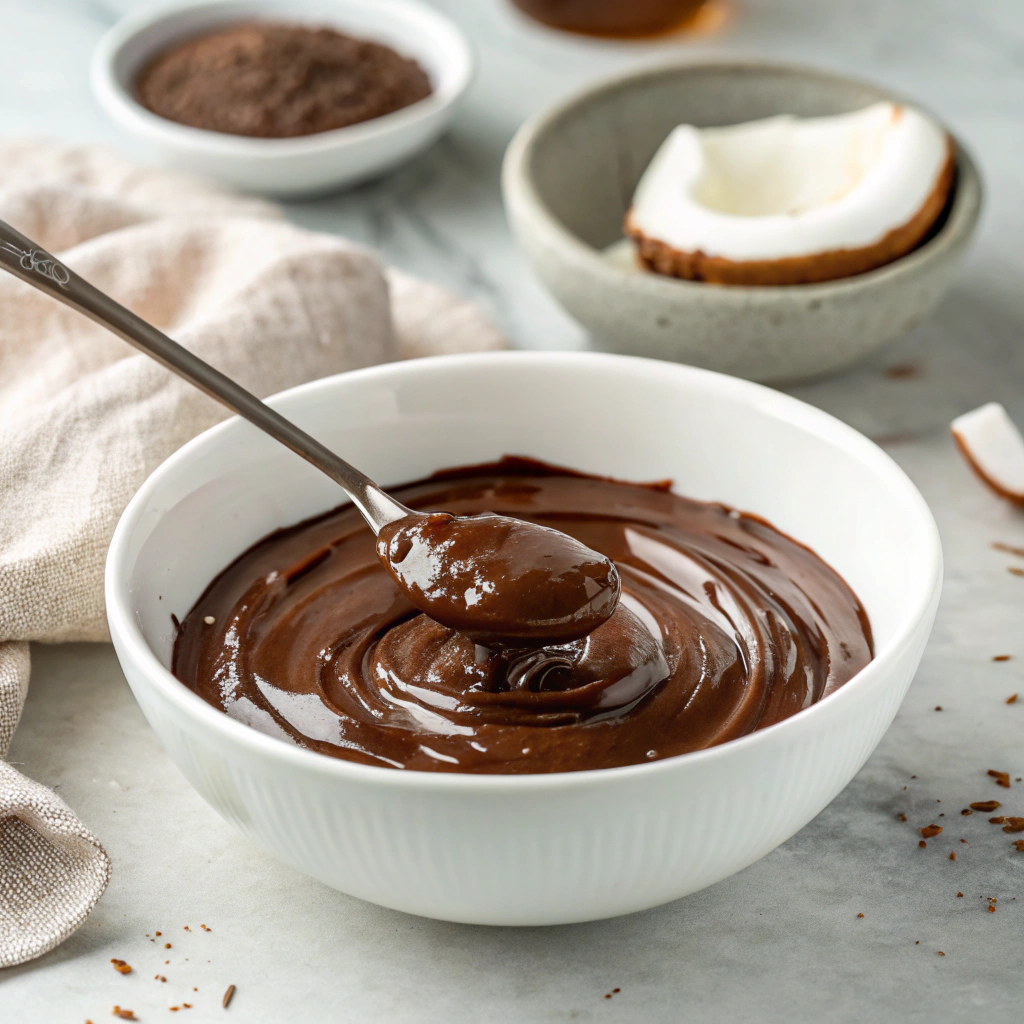
Step 5: Melt the Chocolate
- In a microwave-safe bowl, melt your chocolate candy melts in 30-second intervals, stirring between each until smooth.
- Optional: Stir in a bit of coconut oil to thin the chocolate for easier coating.
Step 6: Insert the Sticks
- Dip the tip of each cake pop stick into the melted chocolate, then insert it halfway into a chilled cake ball.
This “glue” helps the stick stay in place.
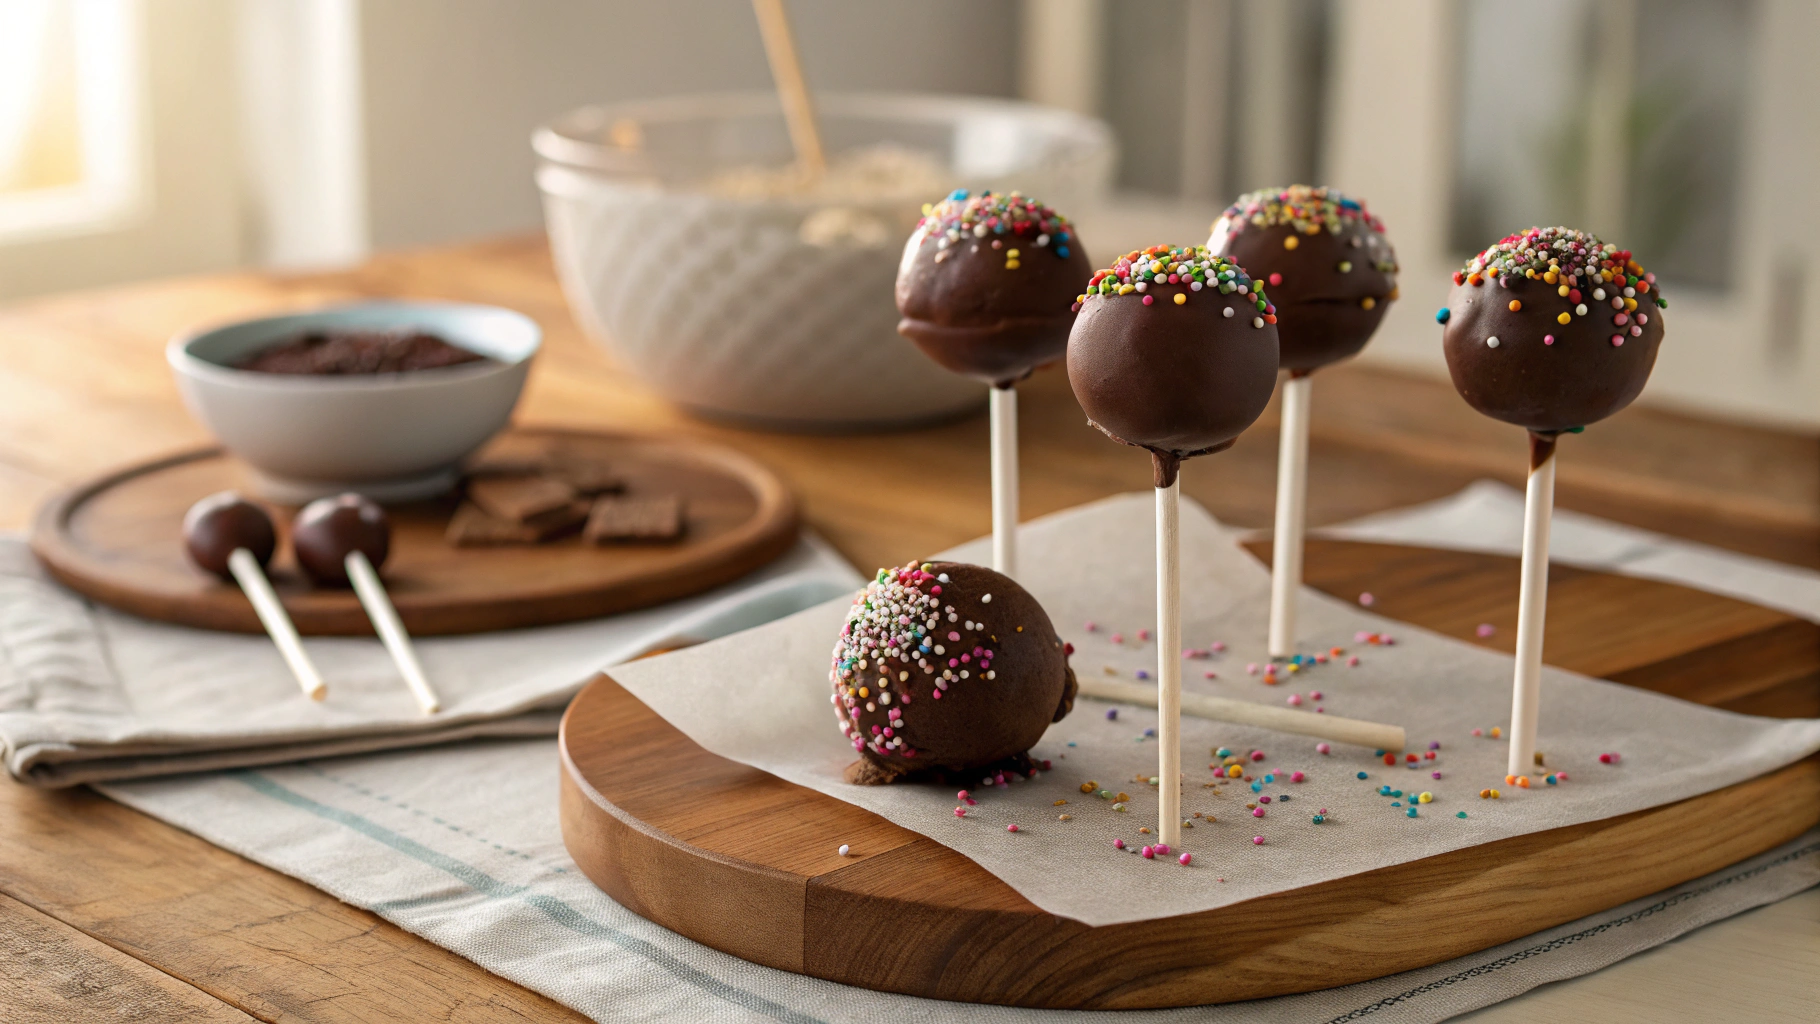
Step 7: Dip & Decorate
- Carefully dip the cake pop into the melted chocolate, turning it to coat evenly.
- Gently tap off excess chocolate and immediately add sprinkles or toppings before it sets.
- Stick the finished pop into a styrofoam block or cake pop stand to dry upright.
Let them set completely at room temperature or chill for quicker results.
And just like that, you’ve got a tray of delightful, kid-approved chocolate cake pops! Whether you’re making them for a birthday party, holiday, or just for fun, this step-by-step method ensures smooth sailing—and delicious results—every time.
Pro Tips and Fun Variations for the Perfect Chocolate Cake Pops
You’ve nailed the basics—now let’s take your chocolate cake pop recipe to the next level. Whether you’re looking to troubleshoot common issues or add a creative twist, these pro tips and variations will help you personalize your pops and make them even more irresistible.
Pro Tips for Smooth, Stress-Free Cake Pops
Use Moist Cake for Best Texture
Dry cake will crumble too much. If your cake feels too dry, add a touch more frosting to help bind it together.
Chill, But Don’t Freeze Too Long
Freezing the cake balls too long can cause cracks when dipping. A quick 30-minute chill in the freezer or 2 hours in the fridge is ideal.
Thin Your Chocolate for a Glossy Finish
If your melted chocolate coating feels too thick, add a teaspoon of coconut oil or shortening to create a silky-smooth dip.
Don’t Overload the Stick
Only dip the stick about ½ inch into the melted chocolate before inserting it into the cake ball. It helps lock the stick in place without cracking the pop.
Tapping Technique Matters
Gently tap your wrist, not the stick itself, when removing excess chocolate. This keeps your cake pop from falling off mid-dip.
Delicious Variations to Try
Flavor Swaps
- Use a vanilla cake base with chocolate coating for a fun contrast.
- Try red velvet cake with white chocolate for a festive twist.
- Add mint extract to the frosting for a refreshing after-dinner pop.
Filling Surprise
- Scoop a bit of peanut butter, Nutella, or jam into the center of the cake ball before rolling it.
Holiday-Themed Pops
- Roll in red and green sprinkles for Christmas, orange and black for Halloween, or pastel tones for Easter.
Dairy-Free & Allergy-Friendly Options
- Use a dairy-free cake mix and vegan chocolate chips to make the recipe more inclusive without sacrificing flavor.
Shaped Cake Pops
- Try shaping them into hearts, stars, or even mini animals using cookie cutters or your hands—perfect for themed parties!
Experimenting with cake pops is half the fun. Once you get the basic technique down, the possibilities are endless. Whether you’re dressing them up for a party or keeping it simple for a sweet snack, these little desserts are guaranteed to bring smiles every time.
Serving Suggestions for Chocolate Cake Pops
Now that your chocolate cake pops are perfectly dipped and decorated, it’s time to think about presentation. Whether you’re hosting a party, prepping a dessert table, or simply serving them up as a sweet surprise, these tips will help you display them beautifully and enjoy them at their best.
Perfect for Every Occasion
Cake pops are incredibly versatile and can fit right into any celebration. Here are a few fun ways to serve them:
- Birthday Parties: Arrange pops on a colorful foam block or tiered stand for a wow-worthy centerpiece. Match the sprinkles to your party theme!
- Holiday Gatherings: Use themed coatings—green and red for Christmas, pink and white for Valentine’s Day, or spooky colors for Halloween.
- School Events or Bake Sales: Wrap each pop in a clear treat bag and tie with a ribbon for an easy, portable, and adorable treat.
- Picnics and Potlucks: Pop them into mason jars or line them on a tray—no forks, no fuss!
Pairings That Pop
Complement your bite-sized chocolate treats with the right beverage or side for an extra layer of indulgence:
- Serve with milk (classic choice for kids)
- Espresso or cappuccino for a more grown-up pairing
- Fresh fruit platters for a balanced dessert table
- Mini cupcakes or cookies for a dessert buffet
Storage & Make-Ahead Tips
- Store cake pops in an airtight container at room temperature for up to 3 days.
- Want to make them ahead? Pop them in the fridge for up to a week or freeze (undipped) for up to a month.
- If refrigerated, let them sit at room temp for 10–15 minutes before serving for the best texture and flavor.
A little creativity in serving goes a long way. Whether you’re going for casual and cute or polished and party-ready, homemade chocolate cake pops bring joy to any table—and a smile to every face.
Conclusion: Why You’ll Love This Chocolate Cake Pop Recipe
Making chocolate cake pops is more than just baking—it’s creating joyful moments, tasty memories, and a little bit of magic in every bite. Whether you’re a seasoned baker or trying this recipe for the first time, you’ll find it delightfully simple and endlessly customizable.
By turning leftover cake into these adorable treats, you’re saving food and crafting something that’s perfect for kids, parties, or just a sweet pick-me-up. Plus, the hands-on process makes it a fantastic way to bond with family or friends.
So, grab your cake crumbs, melt that chocolate, and get ready to impress with a dessert that’s as fun to make as it is to eat. Your kitchen is about to smell amazing, and your loved ones will thank you with every bite!
Don’t forget to experiment with flavors and decorations because the best cake pops are the ones made with a little extra love and creativity.
Happy baking!
What is the trick to making cake pops?
The key trick is to get the right cake-to-frosting ratio so the mixture holds together without being too sticky or dry. Also, chilling the cake balls before dipping helps them stay firm and prevents cracking or falling off the sticks during the chocolate coating process.
What kind of chocolate is best for cake pops?
Candy melts or chocolate melts are ideal because they melt smoothly and harden with a shiny finish. High-quality milk, dark, or white chocolate chips also work well, especially when thinned slightly with a bit of coconut oil or shortening for easier dipping.
What is in a Starbucks chocolate cake pop?
Starbucks’ chocolate cake pop typically includes moist chocolate cake, chocolate frosting, a rich chocolate coating, and is often decorated with sprinkles or chocolate drizzle. The exact proprietary recipe isn’t public, but it’s basically a well-balanced blend of cake crumbs and frosting dipped in chocolate.
What are the ingredients for cake pops?
Basic cake pop ingredients include:
Cake crumbs (homemade or boxed cake)
Frosting (to bind the crumbs)
Chocolate or candy melts (for coating)
Cake pop sticks
Optional decorations like sprinkles or nuts
What not to do when making cake pops?
Don’t skip chilling the cake balls; skipping this step often leads to falling apart.
Avoid using dry cake—moisture is essential for binding.
Don’t dip the sticks too deep or the cake pop may crack.
Avoid overheating chocolate melts, which can cause clumping or burning.
What are the ingredients in chocolate good pop?
If you mean Chocolate Goodpop (the frozen treat brand), typical ingredients include:
Filtered water
Organic cane sugar
Cocoa powder
Organic coconut milk
Natural flavors and stabilizers (varies by flavor)
What are the 4 main ingredients in Coco Pops?
Coco Pops (the cereal) primarily contain:
Rice
Sugar
Cocoa
Salt
What are the ingredients in cocoa pop?
If referring to a cocoa-flavored snack or cereal, common ingredients include:
Cocoa powder
Sugar
Milk powder or dairy (depending on the product)
Grains or cereal base
What are the ingredients in KitKat Pops?
KitKat Pops typically include:
Milk chocolate (sugar, cocoa butter, cocoa mass, milk powder)
Wafer pieces
Vegetable oils
Emulsifiers (like lecithin)
Flavorings (such as vanilla)